Fix LVM Error: Volume Group Holds Max Physical Volumes
🎯 Key Takeaways
- Understanding the Error
- Step-by-Step Solution
- Understanding VG Parameters
- Alternative Commands and Options
- Complete Workflow: Adding Disk to VG
📑 Table of Contents
When managing LVM (Logical Volume Manager) in Linux, you may encounter the error “volume group holds max 1 physical volume(s)” when attempting to add additional disks to a volume group. This limitation is not a hard LVM restriction but rather a configurable parameter that can be adjusted. This comprehensive guide explains the error, its causes, solutions, and best practices for managing volume group physical volume limits in enterprise Linux environments.
📑 Table of Contents
- Understanding the Error
- The Problem Scenario
- Why This Limit Exists
- Step-by-Step Solution
- Step 1: Verify Current Volume Group Configuration
- Step 2: Attempt to Extend (Demonstrates Error)
- Step 3: Change the Volume Group Max PV Limit
- Step 4: Successfully Extend the Volume Group
- Step 5: Verify the Extension
- Understanding VG Parameters
- Max PV Parameter Explained
- Common Max PV Settings
- Alternative Commands and Options
- Setting Max PV During VG Creation
- Other VG Change Operations
- Complete Workflow: Adding Disk to VG
- Full Process from New Disk to Extended LV
- Troubleshooting Common Issues
- Issue: “Volume group not found”
- Issue: “Physical volume already in use”
- Issue: “/dev/cdrom: open failed: No medium found”
- Issue: “Insufficient free extents”
- Best Practices for VG Management
- Volume Group Planning
- Safety Considerations
- Performance Optimization
- Advanced VG Management
- Migrating Data Between PVs
- Splitting and Merging VGs
- Renaming Volume Groups
- Frequently Asked Questions
- Why does my system VG have a max PV limit of 1?
- Will changing max_pv to 0 cause any problems?
- Do I need to unmount filesystems to change max_pv?
- What’s the difference between max_pv and the actual number of PVs?
- Can I add different sized disks to the same volume group?
- What happens if one physical volume fails in a multi-PV volume group?
- How do I check which LVs are using which PVs?
- Should I set a specific max_pv number instead of unlimited?
- Can I decrease max_pv after increasing it?
- Does max_pv affect performance or reliability?
- Conclusion
Understanding the Error
The Problem Scenario
By default, some volume groups are configured to hold only one physical disk. When you attempt to add another disk to expand storage capacity, LVM rejects the operation with this error message:
No space for '/dev/sdb1' - volume group 'system' holds max 1 physical volume(s).
Unable to add physical volume '/dev/sdb1' to volume group 'system'.
Why This Limit Exists
The max_pv (maximum physical volumes) parameter is set during volume group creation. Some Linux distributions or automated installation tools set this to 1 for system volume groups as a safety measure to prevent accidental modifications. However, this limit can be easily changed to accommodate additional storage.
Step-by-Step Solution
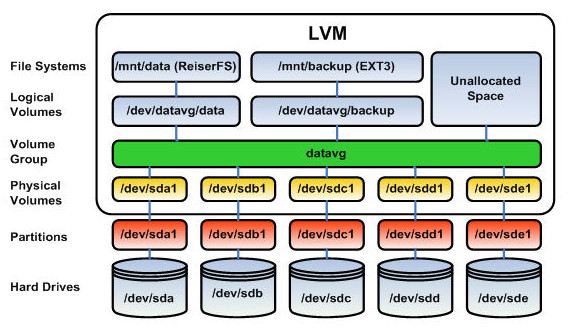
Step 1: Verify Current Volume Group Configuration
Check your current volume groups and their physical volume counts:
# Display volume groups
vgs

# Example output:
VG     #PV #LV #SN Attr   VSize  VFree
applvg   1   1   0 wz--n- 40.68G 692.00M
system   1   7   0 wz--n- 19.88G      0
The #PV column shows how many physical volumes are currently in each volume group. In this example, the ‘system’ VG has only 1 PV.
Step 2: Attempt to Extend (Demonstrates Error)
# Try to extend the system VG with a new disk
vgextend system /dev/sdb1

# Error message:
/dev/cdrom: open failed: No medium found
No space for '/dev/sdb1' - volume group 'system' holds max 1 physical volume(s).
Unable to add physical volume '/dev/sdb1' to volume group 'system'.
Step 3: Change the Volume Group Max PV Limit
Remove the physical volume limit by setting max_pv to 0 (unlimited):
# Change system VG to allow unlimited physical volumes
vgchange system -p 0

# Output:
Volume group "system" successfully changed
The -p 0 parameter sets max_pv to 0, which means unlimited physical volumes can be added to the volume group.
Step 4: Successfully Extend the Volume Group
Now retry adding the physical volume:
# Extend system VG with the new disk
vgextend system /dev/sdb1

# Output:
Volume group "system" successfully extended
Step 5: Verify the Extension
Confirm the new physical volume has been added:
# Check volume groups
vgs

# Output showing 2 PVs now:
VG     #PV #LV #SN Attr   VSize  VFree
applvg   1   1   0 wz--n- 40.68G 692.00M
system   2   7   0 wz--n- 29.19G   9.31G

# Check physical volumes
pvs

# Output:
PV         VG     Fmt  Attr PSize  PFree
/dev/sda2  system lvm2 a--  19.88G      0
/dev/sdb1  system lvm2 a--   9.31G   9.31G
/dev/sdb2  applvg lvm2 a--  40.68G 692.00M
The system volume group now contains 2 physical volumes and has 9.31G of free space available for extending logical volumes.
Understanding VG Parameters
Max PV Parameter Explained
# Display detailed VG information including max_pv
vgdisplay system

# Relevant output:
Max PV                0    # 0 means unlimited
Max LV                0    # Maximum logical volumes (0 = unlimited)
Cur PV                2    # Current number of PVs
Common Max PV Settings
- 0: Unlimited physical volumes (recommended)
- 1: Only one physical volume allowed (overly restrictive)
- 256: Maximum of 256 physical volumes (old LVM1 compatibility)
Alternative Commands and Options
Setting Max PV During VG Creation
# Create VG with unlimited PVs from the start
vgcreate -p 0 datavg /dev/sdc

# Create VG with specific max PV limit
vgcreate -p 10 backupvg /dev/sdd
Other VG Change Operations
# Change max logical volumes
vgchange system -l 0  # 0 = unlimited LVs

# Change both max PV and max LV
vgchange system -p 0 -l 0

# Make volume group inactive (before maintenance)
vgchange -a n system

# Reactivate volume group
vgchange -a y system
Complete Workflow: Adding Disk to VG
Full Process from New Disk to Extended LV
# 1. Identify new disk
lsblk
fdisk -l

# 2. Create physical volume (if needed)
pvcreate /dev/sdb1

# 3. Check current VG max PV limit
vgdisplay system | grep "Max PV"

# 4. Remove max PV limit if needed
vgchange system -p 0

# 5. Extend volume group
vgextend system /dev/sdb1

# 6. Verify extension
vgs
pvs

# 7. Extend logical volume with new space
lvextend -L+9G /dev/system/root

# 8. Resize filesystem
resize2fs /dev/system/root  # for ext4
# or
xfs_growfs /  # for XFS

# 9. Verify final result
df -h
Troubleshooting Common Issues
Issue: “Volume group not found”
# List all volume groups
vgscan

# Activate volume groups
vgchange -ay

# Import volume groups from different system
vgimport system
Issue: “Physical volume already in use”
# Check if PV is already assigned
pvs /dev/sdb1

# Remove from old VG first
vgreduce oldvg /dev/sdb1

# Remove PV signature
pvremove /dev/sdb1

# Recreate and add to new VG
pvcreate /dev/sdb1
vgextend system /dev/sdb1
Issue: “/dev/cdrom: open failed: No medium found”
This warning appears when LVM scans all devices including optical drives. It’s harmless and can be ignored, or you can filter it:
# Edit LVM configuration to exclude optical drives
vim /etc/lvm/lvm.conf

# Add filter line:
filter = [ "r|/dev/cdrom|" ]

# Rebuild LVM cache
pvscan --cache
Issue: “Insufficient free extents”
# Check actual free space
vgs -o +vg_free

# Check physical extent size
vgdisplay system | grep "PE Size"

# Use all available space
lvextend -l +100%FREE /dev/system/root
Best Practices for VG Management
Volume Group Planning
- Set max_pv to 0: Unless you have specific reasons to limit, allow unlimited PVs
- Group related storage: Create separate VGs for different purposes (system, data, backup)
- Plan for growth: Consider future expansion needs when creating VGs
- Document limits: If you set specific max_pv values, document why
Safety Considerations
- Backup before changes: Always backup critical data before LVM modifications
- Test in non-production: Practice VG expansion in test environments
- Monitor disk health: Use SMART monitoring on all physical volumes
- Avoid spanning critical data: Consider RAID for fault tolerance instead of spanning multiple disks
Performance Optimization
# Use striping for better performance across multiple PVs
lvcreate -L 10G -i 2 -I 64 -n stripedlv system

# Check LV layout
lvs -o +devices,stripes

# Display I/O statistics
lvs -o +lv_read_ahead
Advanced VG Management
Migrating Data Between PVs
# Move data from one PV to another within same VG
pvmove /dev/sda2 /dev/sdb1

# Remove old PV after migration
vgreduce system /dev/sda2
pvremove /dev/sda2
Splitting and Merging VGs
# Split VG (move PV to new VG)
vgsplit system newvg /dev/sdb1

# Merge VGs
vgmerge system oldvg
Renaming Volume Groups
# Rename VG
vgrename system systemvg

# Update /etc/fstab and bootloader after renaming
Frequently Asked Questions
Why does my system VG have a max PV limit of 1?
Some Linux distributions and automated installers set conservative limits during installation to prevent accidental modifications to the system volume group. This is a safety feature, not a technical limitation. You can safely change it to 0 (unlimited) using “vgchange system -p 0” when you need to add more storage. This limit exists in configuration, not as a hard LVM restriction.
Will changing max_pv to 0 cause any problems?
No, setting max_pv to 0 (unlimited) is safe and recommended for most use cases. It simply removes the artificial limit on how many physical volumes can be added to the volume group. This is the standard configuration for flexibility. The only scenario where limiting max_pv makes sense is in highly controlled environments where strict change management is required, but even then, it’s rarely beneficial.
Do I need to unmount filesystems to change max_pv?
No, changing the max_pv parameter with vgchange is a metadata operation that doesn’t require unmounting filesystems or disrupting running services. The volume group remains active and accessible throughout the change. You can perform this operation on live production systems without downtime. Only the actual vgextend operation that adds new storage requires brief LVM metadata updates.
What’s the difference between max_pv and the actual number of PVs?
Max_pv is the configured limit (maximum allowed), while the current PV count is how many physical volumes are actually in the volume group now. For example, max_pv might be 10 (or 0 for unlimited), but current PV count could be 2. Max_pv prevents adding more PVs beyond the limit; current count shows actual usage. Check with “vgdisplay” to see both values.
Can I add different sized disks to the same volume group?
Yes, absolutely. Volume groups can contain physical volumes of any size, and LVM handles the different sizes transparently. You can mix 10GB, 50GB, 500GB, and 1TB disks in the same VG. LVM pools the total space and allocates logical volumes across the available physical volumes as needed. This flexibility is one of LVM’s key advantages over traditional partitioning.
What happens if one physical volume fails in a multi-PV volume group?
If a logical volume spans the failed disk, data on that LV becomes inaccessible or corrupted. LVM doesn’t provide fault tolerance by default—it’s not RAID. For critical data, use LVM on top of RAID, or use LVM mirroring (lvconvert –type mirror), or implement redundancy at the application level. Regular backups are essential. The failure affects only LVs that had data on the failed PV, not the entire VG.
How do I check which LVs are using which PVs?
Use “lvs -o +devices” to see the physical volume allocation for each logical volume. Example: “lvs -o +lv_name,vg_name,devices system”. This shows exactly which physical volumes contain each LV’s data. For even more detail, use “pvdisplay -m” to see physical extent mappings. This information is crucial before removing or migrating physical volumes.
Should I set a specific max_pv number instead of unlimited?
For most environments, unlimited (0) is recommended for maximum flexibility. Set a specific limit only if you have strict capacity planning requirements or regulatory compliance needs that mandate controlled storage expansion. For example, in some financial or government systems, administrators might limit max_pv to prevent uncontrolled growth. For typical servers, development systems, and most production environments, unlimited is the practical choice.
Can I decrease max_pv after increasing it?
Yes, but only if the new limit is equal to or greater than the current number of physical volumes. For example, if you have 3 PVs in a VG, you can’t set max_pv to 2 or 1 because it would violate the current state. You’d need to first remove PVs with “vgreduce” until the count is below your desired limit, then set the new max_pv with vgchange.
Does max_pv affect performance or reliability?
No, the max_pv setting is purely an administrative limit and has zero impact on performance, reliability, or data integrity. It’s metadata that LVM checks before allowing vgextend operations. Performance depends on disk speed, RAID configuration, filesystem choices, and I/O patterns—not on max_pv settings. This parameter exists solely for capacity planning and change control purposes.
Conclusion
The “volume group holds max 1 physical volume(s)” error is a simple configuration limit that can be resolved in seconds with the vgchange command. Understanding LVM’s max_pv parameter and how to modify it is essential for Linux system administrators managing growing storage requirements. By setting max_pv to 0 (unlimited), you enable flexible storage expansion without artificial constraints, allowing your infrastructure to scale as needed.
Whether you’re managing a single server or an enterprise data center, knowing how to properly extend volume groups, add physical volumes, and manage LVM limits ensures you can respond quickly to storage demands. Combined with best practices like backups, monitoring, and proper planning, LVM provides the flexible, powerful storage management that modern Linux systems require.
Was this article helpful?
About Ramesh Sundararamaiah
Red Hat Certified Architect
Expert in Linux system administration, DevOps automation, and cloud infrastructure. Specializing in Red Hat Enterprise Linux, CentOS, Ubuntu, Docker, Ansible, and enterprise IT solutions.