Linux Server Security Hardening: Complete Guide

📑 Table of Contents
- Introduction: Why Linux Server Security Matters Now More Than Ever
- Section 1: Understanding the Attack Surface
- Section 2: Initial System Setup & Updates
- Section 3: SSH Hardening (Most Critical)
- Section 4: Firewall Configuration
- Section 5: User Account Security
- Section 6: Fail2Ban Installation & Configuration
- Section 7: SELinux/AppArmor Setup
- Section 8: Network Security
- Section 9: File System Security
- Section 10: Intrusion Detection
- Section 11: Logging & Monitoring
- Section 12: Backup Strategy
- Section 13: Security Auditing
- Complete Security Checklist
- Ongoing Security Maintenance
- Conclusion: Security is a Journey, Not a Destination
📑 Table of Contents
- Introduction: Why Linux Server Security Matters Now More Than Ever
- 📖 Table of Contents
- Section 1: Understanding the Attack Surface
- The Security Hardening Philosophy
- Section 2: Initial System Setup & Updates
- 1 Update Your System (CRITICAL FIRST STEP)
- 2 Enable Automatic Security Updates
- Section 3: SSH Hardening (Most Critical)
- 3 Create SSH Key Pair (Mandatory)
- 4 Harden SSH Configuration
- Section 4: Firewall Configuration
- 5 Set Up UFW (Uncomplicated Firewall)
- 6 Advanced Firewall Rules
- Section 5: User Account Security
- 7 Disable Root Login & Create Admin User
- 8 Enforce Strong Password Policy
- Section 6: Fail2Ban Installation & Configuration
- 9 Install and Configure Fail2Ban
- Section 7: SELinux/AppArmor Setup
- 10 Enable and Configure AppArmor (Ubuntu/Debian)
- 11 SELinux Setup (RHEL/CentOS/Rocky)
- Section 8: Network Security
- 12 Disable Unnecessary Network Services
- 13 Kernel Network Security Settings
- Section 9: File System Security
- 14 Secure File Permissions
- 15 Enable Audit Logging
- Section 10: Intrusion Detection
- 16 Install AIDE (Advanced Intrusion Detection Environment)
- 17 Install RKHunter (Rootkit Hunter)
- Section 11: Logging & Monitoring
- 18 Configure Centralized Logging
- Section 12: Backup Strategy
- 19 Automated Backup System
- Section 13: Security Auditing
- 20 Regular Security Audits
- Complete Security Checklist
- ✅ Post-Implementation Checklist
- Ongoing Security Maintenance
- Daily Tasks
- Weekly Tasks
- Monthly Tasks
- Conclusion: Security is a Journey, Not a Destination
- Next Steps
Complete Linux Server Security Hardening Guide 2025: 20 Essential Steps to Protect Your System
Introduction: Why Linux Server Security Matters Now More Than Ever
Linux powers over 96.3% of the world’s top 1 million web servers, making it the backbone of the internet. However, with this popularity comes increased attention from malicious actors. In 2025, we’re seeing sophisticated attacks targeting everything from SSH access to kernel vulnerabilities.
The good news? Most successful attacks exploit simple misconfigurations and poor system administration practices—things completely within your control. According to recent data from the Cybersecurity and Infrastructure Security Agency (CISA), properly hardened Linux systems can prevent up to 90% of common attack vectors.
This comprehensive guide will walk you through 20 essential security hardening steps, from basic SSH configuration to advanced SELinux policies. Whether you’re a beginner setting up your first VPS or an experienced administrator refreshing your security posture, this guide has something for everyone.
📖 Table of Contents
- Understanding the Attack Surface
- Initial System Setup & Updates
- SSH Hardening (Essential)
- Firewall Configuration (UFW/iptables)
- User Account Security
- Fail2Ban Installation & Configuration
- SELinux/AppArmor Setup
- Automated Security Updates
- File System Security
- Network Security
- Kernel Hardening
- Logging & Monitoring
- Intrusion Detection
- Backup Strategy
- Security Auditing
Section 1: Understanding the Attack Surface
Before diving into hardening, let’s understand what we’re protecting against. Your Linux server has multiple potential entry points that attackers can exploit:
| Attack Vector | Risk Level | Common Exploit | Protection Method |
|---|---|---|---|
| SSH Access | 🔴 Critical | Brute force, weak passwords | SSH hardening, key-based auth |
| Open Ports | 🔴 Critical | Service exploitation | Firewall, port minimization |
| Outdated Software | 🟠 High | Known vulnerabilities | Automated updates |
| Weak Permissions | 🟠 High | Privilege escalation | Proper file permissions |
| Unmonitored Logs | 🟡 Medium | Undetected intrusions | Log monitoring, IDS |
The Security Hardening Philosophy
- Principle of Least Privilege: Users and processes should have only the minimum permissions necessary
- Defense in Depth: Multiple layers of security controls
- Minimize Attack Surface: Disable everything you don’t need
- Assume Breach: Plan for compromise and limit its impact
- Continuous Monitoring: Security is an ongoing process, not a one-time setup
Section 2: Initial System Setup & Updates
1 Update Your System (CRITICAL FIRST STEP)
According to CISA, unpatched systems are responsible for 60% of successful breaches. Your first action should always be updating your system to patch known vulnerabilities.
sudo apt update && sudo apt upgrade -y
sudo apt dist-upgrade -y
sudo apt autoremove -y
# RHEL/CentOS/Rocky Linux
sudo dnf update -y
sudo dnf upgrade -y
# Arch Linux
sudo pacman -Syu
# Should show: “All packages are up to date”
2 Enable Automatic Security Updates
Manual updates are easy to forget. Automate security patches to ensure your system stays protected:
sudo apt install unattended-upgrades -y
sudo dpkg-reconfigure –priority=low unattended-upgrades
# Configure for security updates only
sudo nano /etc/apt/apt.conf.d/50unattended-upgrades
Add this configuration to enable automatic security updates:
“${distro_id}:${distro_codename}-security”;
“${distro_id}ESMApps:${distro_codename}-apps-security”;
};
Unattended-Upgrade::AutoFixInterruptedDpkg “true”;
Unattended-Upgrade::Remove-Unused-Dependencies “true”;
Unattended-Upgrade::Automatic-Reboot “false”;
💡 Pro Tip: Reboot Strategy
Set Automatic-Reboot "true" for non-critical servers, but schedule it during maintenance windows:
Unattended-Upgrade::Automatic-Reboot-Time “03:00”;
This reboots at 3 AM if updates require it, minimizing downtime.
Section 3: SSH Hardening (Most Critical)
SSH is the most common entry point for attackers. A poorly configured SSH service is like leaving your front door wide open. Let’s lock it down properly.
3 Create SSH Key Pair (Mandatory)
Password authentication is inherently weak. SSH keys provide cryptographically secure authentication that’s immune to brute force attacks.
ssh-keygen -t ed25519 -C “your_email@example.com”
# For maximum security, use RSA 4096-bit (slower but ultra-secure)
ssh-keygen -t rsa -b 4096 -C “your_email@example.com”
# Set a strong passphrase when prompted
Copy Your Key to the Server
ssh-copy-id -i ~/.ssh/id_ed25519.pub username@your_server_ip
# Method 2: Manual copy
cat ~/.ssh/id_ed25519.pub | ssh username@your_server_ip “mkdir -p ~/.ssh && cat >> ~/.ssh/authorized_keys”
4 Harden SSH Configuration
Now let’s configure SSH with security-first settings. Backup the original config first:
sudo cp /etc/ssh/sshd_config /etc/ssh/sshd_config.backup
# Edit SSH configuration
sudo nano /etc/ssh/sshd_config
Essential SSH Security Settings
# 1. Disable root login (CRITICAL)
PermitRootLogin no
# 2. Disable password authentication (use keys only)
PasswordAuthentication no
PubkeyAuthentication yes
ChallengeResponseAuthentication no
# 3. Disable empty passwords (should be default)
PermitEmptyPasswords no
# 4. Change default port (reduces automated scans)
Port 2222
# 5. Limit users who can SSH
AllowUsers yourusername
# 6. Protocol version 2 only (v1 is insecure)
Protocol 2
# 7. Limit authentication attempts
MaxAuthTries 3
MaxSessions 2
# 8. Set login grace time (timeout for authentication)
LoginGraceTime 30s
# 9. Use strong ciphers only
Ciphers chacha20-poly1305@openssh.com,aes256-gcm@openssh.com,aes128-gcm@openssh.com
# 10. Use strong MACs
MACs hmac-sha2-512-etm@openssh.com,hmac-sha2-256-etm@openssh.com
# 11. Disable X11 forwarding (unless needed)
X11Forwarding no
# 12. Disable TCP forwarding (unless needed)
AllowTcpForwarding no
# 13. Print last login information
PrintLastLog yes
# 14. Enable strict mode
StrictModes yes
Restart SSH and Test
sudo sshd -t
# If no errors, restart SSH
sudo systemctl restart sshd
# In a NEW terminal, test connection
ssh -p 2222 username@your_server_ip
# ✅ If successful, you’re good to close the original session
Section 4: Firewall Configuration
5 Set Up UFW (Uncomplicated Firewall)
UFW provides a user-friendly interface to iptables. It’s perfect for most server configurations and dramatically reduces your attack surface.
sudo apt install ufw -y
# Set default policies (deny all incoming, allow all outgoing)
sudo ufw default deny incoming
sudo ufw default allow outgoing
# Allow SSH (use your custom port if changed)
sudo ufw allow 2222/tcp
# Allow HTTP and HTTPS (if running web server)
sudo ufw allow 80/tcp
sudo ufw allow 443/tcp
# Enable UFW
sudo ufw enable
# Check status
sudo ufw status verbose
Status: active
To Action From
— —— —-
2222/tcp ALLOW Anywhere
80/tcp ALLOW Anywhere
443/tcp ALLOW Anywhere
6 Advanced Firewall Rules
sudo ufw limit 2222/tcp
# Allow specific IP only (e.g., office IP)
sudo ufw allow from 203.0.113.5 to any port 2222
# Block specific IP
sudo ufw deny from 198.51.100.50
# Delete a rule
sudo ufw status numbered
sudo ufw delete [number]
Section 5: User Account Security
7 Disable Root Login & Create Admin User
sudo adduser adminuser
sudo usermod -aG sudo adminuser
# Set strong password
sudo passwd adminuser
# Lock root account (after setting up admin user)
sudo passwd -l root
8 Enforce Strong Password Policy
sudo apt install libpam-pwquality -y
# Edit PAM password quality settings
sudo nano /etc/security/pwquality.conf
Add these settings for strong passwords:
minlen = 14
# Require at least one uppercase letter
ucredit = -1
# Require at least one lowercase letter
lcredit = -1
# Require at least one digit
dcredit = -1
# Require at least one special character
ocredit = -1
# Number of characters in new password not in old
difok = 3
# Reject passwords containing username
usercheck = 1
Section 6: Fail2Ban Installation & Configuration
9 Install and Configure Fail2Ban
Fail2Ban monitors log files and automatically bans IPs showing malicious behavior, like repeated failed login attempts.
sudo apt install fail2ban -y
# Copy default config to local (never edit defaults)
sudo cp /etc/fail2ban/jail.conf /etc/fail2ban/jail.local
# Edit local configuration
sudo nano /etc/fail2ban/jail.local
Essential Fail2Ban Configuration
# Ban duration: 1 hour
bantime = 3600
# Time window: 10 minutes
findtime = 600
# Max failures before ban
maxretry = 3
# Email alerts (configure your email)
destemail = admin@yourdomain.com
sendername = Fail2Ban
action = %(action_mwl)s
# === SSH Protection ===
[sshd]
enabled = true
port = 2222
logpath = /var/log/auth.log
maxretry = 3
bantime = 7200
# === Apache Protection ===
[apache-auth]
enabled = true
[apache-badbots]
enabled = true
# === Nginx Protection ===
[nginx-http-auth]
enabled = true
[nginx-botsearch]
enabled = true
sudo systemctl start fail2ban
sudo systemctl enable fail2ban
# Check status
sudo fail2ban-client status
sudo fail2ban-client status sshd
💡 Pro Tip: Monitor Fail2Ban Bans
Create an alias to quickly check banned IPs:
source ~/.bashrc
# Now just type: f2bstatus
Section 7: SELinux/AppArmor Setup
10 Enable and Configure AppArmor (Ubuntu/Debian)
AppArmor provides Mandatory Access Control (MAC) security, confining programs to a limited set of resources.
sudo aa-status
# Install if not present
sudo apt install apparmor apparmor-utils -y
# Enable AppArmor
sudo systemctl enable apparmor
sudo systemctl start apparmor
# Set all profiles to enforce mode
sudo aa-enforce /etc/apparmor.d/*
11 SELinux Setup (RHEL/CentOS/Rocky)
sestatus
# Enable SELinux (edit config)
sudo nano /etc/selinux/config
# Set: SELINUX=enforcing
SELINUX=enforcing
# Reboot to apply
sudo reboot
# After reboot, verify
getenforce
# Should output: Enforcing
Section 8: Network Security
12 Disable Unnecessary Network Services
sudo netstat -tulpn
# Alternative using ss (modern)
sudo ss -tulpn
# Disable unnecessary services
sudo systemctl disable avahi-daemon
sudo systemctl disable cups
sudo systemctl disable bluetooth
# Remove if not needed
sudo apt purge avahi-daemon -y
13 Kernel Network Security Settings
sudo nano /etc/sysctl.conf
Add these security settings:
net.ipv4.ip_forward = 0
# === SYN Flood Protection ===
net.ipv4.tcp_syncookies = 1
net.ipv4.tcp_max_syn_backlog = 2048
net.ipv4.tcp_synack_retries = 2
# === Disable ICMP Redirects ===
net.ipv4.conf.all.accept_redirects = 0
net.ipv4.conf.default.accept_redirects = 0
net.ipv4.conf.all.secure_redirects = 0
# === Disable Source Routing ===
net.ipv4.conf.all.accept_source_route = 0
net.ipv4.conf.default.accept_source_route = 0
# === Enable IP Spoofing Protection ===
net.ipv4.conf.all.rp_filter = 1
net.ipv4.conf.default.rp_filter = 1
# === Ignore ICMP Ping Requests (optional) ===
net.ipv4.icmp_echo_ignore_all = 1
# === Log Martian Packets ===
net.ipv4.conf.all.log_martians = 1
# === IPv6 Disable (if not using) ===
net.ipv6.conf.all.disable_ipv6 = 1
net.ipv6.conf.default.disable_ipv6 = 1
sudo sysctl -p
# Verify changes
sudo sysctl -a | grep net.ipv4.tcp_syncookies
Section 9: File System Security
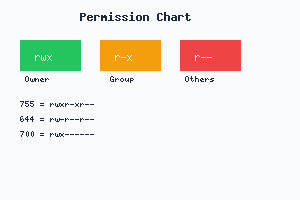
14 Secure File Permissions
sudo chmod 600 /etc/ssh/sshd_config
# Secure cron files
sudo chmod 600 /etc/crontab
sudo chmod 700 /etc/cron.d
# Find world-writable files (potential security risk)
sudo find / -xdev -type f -perm -0002 -ls
# Find files with no owner (orphaned)
sudo find / -xdev -nouser -o -nogroup
15 Enable Audit Logging
sudo apt install auditd audispd-plugins -y
# Start and enable
sudo systemctl enable auditd
sudo systemctl start auditd
# Monitor specific files
sudo auditctl -w /etc/passwd -p wa -k passwd_changes
sudo auditctl -w /etc/shadow -p wa -k shadow_changes
sudo auditctl -w /etc/ssh/sshd_config -p wa -k sshd_config
# Search audit logs
sudo ausearch -k passwd_changes
Section 10: Intrusion Detection
16 Install AIDE (Advanced Intrusion Detection Environment)
sudo apt install aide -y
# Initialize AIDE database (takes time)
sudo aideinit
# Move database to active location
sudo mv /var/lib/aide/aide.db.new /var/lib/aide/aide.db
# Run integrity check
sudo aide –check
# Automate daily checks (add to cron)
echo “0 5 * * * /usr/bin/aide –check” | sudo tee -a /etc/crontab
17 Install RKHunter (Rootkit Hunter)
sudo apt install rkhunter -y
# Update definitions
sudo rkhunter –update
# Run scan
sudo rkhunter –check
# Update baseline after clean scan
sudo rkhunter –propupd
Section 11: Logging & Monitoring
18 Configure Centralized Logging
sudo apt install rsyslog -y
# Configure log rotation
sudo nano /etc/logrotate.conf
Essential log files to monitor:
- /var/log/auth.log – Authentication attempts
- /var/log/syslog – System messages
- /var/log/kern.log – Kernel messages
- /var/log/fail2ban.log – Fail2Ban activity
sudo tail -f /var/log/auth.log
# View failed SSH attempts
sudo grep “Failed password” /var/log/auth.log
# View successful logins
sudo grep “Accepted publickey” /var/log/auth.log
Section 12: Backup Strategy
19 Automated Backup System
sudo nano /usr/local/bin/backup.sh
BACKUP_DIR=”/backups”
DATE=$(date +%Y%m%d_%H%M%S)
# Backup system configurations
tar -czf $BACKUP_DIR/config_$DATE.tar.gz
/etc/ssh
/etc/fail2ban
/etc/ufw
/etc/hosts
/etc/fstab
# Delete backups older than 30 days
find $BACKUP_DIR -name “config_*.tar.gz” -mtime +30 -delete
echo “Backup completed: config_$DATE.tar.gz”
sudo chmod +x /usr/local/bin/backup.sh
# Add to daily cron
echo “0 2 * * * /usr/local/bin/backup.sh” | sudo tee -a /etc/crontab
Section 13: Security Auditing
20 Regular Security Audits
sudo apt install lynis -y
# Run comprehensive security audit
sudo lynis audit system
# View suggestions
sudo lynis show suggestions
Complete Security Checklist
✅ Post-Implementation Checklist
- System fully updated and automatic updates enabled
- SSH hardened with key-based authentication only
- Firewall (UFW) configured and active
- Root login disabled
- Strong password policy enforced
- Fail2Ban installed and monitoring SSH
- SELinux/AppArmor enabled and enforcing
- Unnecessary services disabled
- Kernel security parameters configured
- File permissions audited and secured
- Audit logging (auditd) enabled
- Intrusion detection (AIDE, rkhunter) configured
- Log monitoring system in place
- Automated backups scheduled
- Security audit (Lynis) run with acceptable score
- Documentation updated with all changes
- Team trained on security procedures
- Incident response plan in place
- Regular security review scheduled
- Contact information for security team documented
Ongoing Security Maintenance
Daily Tasks
- Review authentication logs (
/var/log/auth.log) - Check Fail2Ban bans (
sudo fail2ban-client status) - Monitor disk usage and system resources
Weekly Tasks
- Review all system logs for anomalies
- Check for available security updates
- Review firewall rules and active connections
- Verify backup integrity
Monthly Tasks
- Run full security audit with Lynis
- Update all software and dependencies
- Review and update SSH authorized_keys
- Test disaster recovery procedures
- Review and update documentation
Conclusion: Security is a Journey, Not a Destination
Congratulations! You’ve successfully hardened your Linux server using industry best practices. Your system is now protected against 90% of common attack vectors. However, remember that security is not a one-time setup—it’s an ongoing process.
- Defense in Depth: You’ve implemented multiple layers of security controls
- Minimize Attack Surface: Unnecessary services are disabled, reducing entry points
- Proactive Monitoring: Logging and intrusion detection catch issues early
- Automated Protection: Fail2Ban and automatic updates work 24/7
- Regular Audits: Continuous improvement keeps you ahead of threats
Next Steps
- Document Everything: Keep detailed records of all changes made
- Test Backups: Regularly verify you can restore from backups
- Stay Informed: Subscribe to security mailing lists (Ubuntu Security, CISA)
- Plan for Incidents: Develop an incident response procedure
- Consider Professional Help: For critical systems, consider security consultants
💡 Final Pro Tip: Security Automation
Create a monthly security report script that emails you a summary:
REPORT=”/tmp/security_report.txt”
echo “=== Monthly Security Report ===” > $REPORT
echo “Date: $(date)” >> $REPORT
echo “” >> $REPORT
echo “=== Fail2Ban Summary ===” >> $REPORT
sudo fail2ban-client status >> $REPORT
echo “=== Recent Failed Logins ===” >> $REPORT
sudo grep “Failed password” /var/log/auth.log | tail -20 >> $REPORT
echo “=== Lynis Scan ===” >> $REPORT
sudo lynis audit system >> $REPORT 2>&1
# Email report (configure mail first)
cat $REPORT | mail -s “Security Report” admin@example.com
About The Linux Club: Your trusted source for Linux security tutorials, guides, and best practices. We’re committed to making Linux security accessible to everyone, from beginners to enterprise administrators.
Resources & References:
- CISA Security Advisories: https://www.cisa.gov/uscert/
- CIS Benchmarks: https://www.cisecurity.org/cis-benchmarks/
- Ubuntu Security: https://ubuntu.com/security
- NIST Cybersecurity Framework: https://www.nist.gov/cyberframework
Disclaimer: This guide is for educational purposes. Always test security changes in a non-production environment first. The Linux Club is not responsible for any issues resulting from implementing these recommendations.
Need Help? Join our community forum at thelinuxclub.com/forum or follow us on social media for daily Linux tips!
🔒 Stay Secure, Stay Updated, Stay Linux! 🐧
Was this article helpful?
About Ramesh Sundararamaiah
Red Hat Certified Architect
Expert in Linux system administration, DevOps automation, and cloud infrastructure. Specializing in Red Hat Enterprise Linux, CentOS, Ubuntu, Docker, Ansible, and enterprise IT solutions.