Reducing space in LVM partition and removing disk from the server
You might have allocated more space to lvm partition for future use but now its not required hence you are planning to reduce the LVM partition and to remove the disk from the server. This can be done only offline so you need to get downtime if there is any application holding this filesystem to unmount it to perform below steps.
suse11-1:~ # df -h
Filesystem                 Size  Used Avail Use% Mounted on
/dev/vda2                   19G  3.6G   14G  21% /
udev                       435M  148K  435M   1% /dev
tmpfs                      435M  796K  434M   1% /dev/shm
/dev/mapper/testvg-testlv  8.9G  271M  8.2G   4% /test
suse11-1:~ #
suse11-1:~ # umount /test/
suse11-1:~ # df -h
Filesystem      Size  Used Avail Use% Mounted on
/dev/vda2        19G  3.6G   14G  21% /
udev            435M  148K  435M   1% /dev
tmpfs           435M  796K  434M   1% /dev/shm
suse11-1:~ #
suse11-1:~ # e2fsck -f /dev/mapper/testvg-testlv
e2fsck 1.41.9 (22-Aug-2009)
Pass 1: Checking inodes, blocks, and sizes
Pass 2: Checking directory structure
Pass 3: Checking directory connectivity
Pass 4: Checking reference counts
Pass 5: Checking group summary information
/dev/mapper/testvg-testlv: 13/588672 files (15.4% non-contiguous), 106205/2359296 blocks
suse11-1:~ #
suse11-1:~ # resize2fs /dev/mapper/testvg-testlv 3G
resize2fs 1.41.9 (22-Aug-2009)
Resizing the filesystem on /dev/mapper/testvg-testlv to 786432 (4k) blocks.
The filesystem on /dev/mapper/testvg-testlv is now 786432 blocks long.
suse11-1:~ #
suse11-1:~ # lvreduce -L 3G /dev/mapper/testvg-testlv
WARNING: Reducing active logical volume to 3.00 GiB
THIS MAY DESTROY YOUR DATA (filesystem etc.)
Do you really want to reduce testlv? [y/n]: y
Reducing logical volume testlv to 3.00 GiB
Logical volume testlv successfully resized
suse11-1:~ #
suse11-1:~ # mount /dev/mapper/testvg-testlv /test/
suse11-1:~ # df -h
Filesystem                 Size  Used Avail Use% Mounted on
/dev/vda2                   19G  3.6G   14G  21% /
udev                       435M  148K  435M   1% /dev
tmpfs                      435M  796K  434M   1% /dev/shm
/dev/mapper/testvg-testlv  3.0G  264M  2.6G  10% /test
suse11-1:~ #
In other way we can reduce the LVM partition using single command with -r option as shown below but this will work in RHEL 5 and later. I tried this in Suse 11 SP4 and worked fine but I’m not sure this will work in earlier versions of Suse 11 SP4
suse11-1:~ # df -h
Filesystem                 Size  Used Avail Use% Mounted on
/dev/vda2                   19G  3.6G   14G  21% /
udev                       435M  148K  435M   1% /dev
tmpfs                      435M  796K  434M   1% /dev/shm
/dev/mapper/testvg-testlv  8.9G  271M  8.2G   4% /test
suse11-1:~ # umount /test/

suse11-1:~ # df -h
Filesystem      Size  Used Avail Use% Mounted on
/dev/vda2        19G  3.6G   14G  21% /
udev            435M  148K  435M   1% /dev
tmpfs           435M  796K  434M   1% /dev/shm
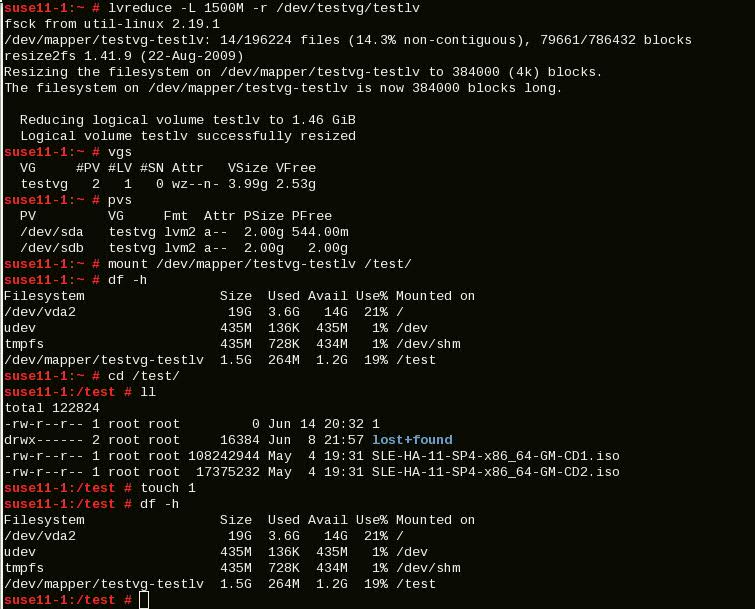
suse11-1:~ # lvreduce -L 3G -r /dev/testvg/testlv
fsck from util-linux 2.19.1
/dev/mapper/testvg-testlv: 13/588672 files (15.4% non-contiguous), 106205/2359296 blocks
resize2fs 1.41.9 (22-Aug-2009)
Resizing the filesystem on /dev/mapper/testvg-testlv to 786432 (4k) blocks.
The filesystem on /dev/mapper/testvg-testlv is now 786432 blocks long.

Reducing logical volume testlv to 3.00 GiB
Logical volume testlv successfully resized
suse11-1:~ #
suse11-1:~ # mount /dev/testvg/testlv /test/
suse11-1:~ # df -h
Filesystem                 Size  Used Avail Use% Mounted on
/dev/vda2                   19G  3.6G   14G  21% /
udev                       435M  148K  435M   1% /dev
tmpfs                      435M  796K  434M   1% /dev/shm
/dev/mapper/testvg-testlv  3.0G  264M  2.6G  10% /test
suse11-1:~ #
suse11-1:~ # vgs
VG     #PV #LV #SN Attr   VSize VFree
testvg   5   1   0 wz--n- 9.98g 6.98g
suse11-1:~ # pvs
PV         VG     Fmt  Attr PSize PFree
/dev/sda   testvg lvm2 a--  2.00g       0
/dev/sdb   testvg lvm2 a--  2.00g 1016.00m
/dev/sdc   testvg lvm2 a--  2.00g    2.00g
/dev/vdb   testvg lvm2 a--  2.00g    2.00g
/dev/vdc   testvg lvm2 a--  2.00g    2.00g
suse11-1:~ # lvs
LV     VG     Attr      LSize Pool Origin Data%  Move Log Copy%  Convert
testlv testvg -wi-ao--- 3.00g
Now we have enough free space available in Volume group. You can allocate this space to another LVM in the same VG or you can reclaim the disks if don’t need space to any other file systems in the server
suse11-1:~ # vgs
VG     #PV #LV #SN Attr   VSize VFree
testvg   5   1   0 wz--n- 9.98g 6.98g
suse11-1:~ # pvs
PV         VG     Fmt  Attr PSize PFree
/dev/sda   testvg lvm2 a--  2.00g       0
/dev/sdb   testvg lvm2 a--  2.00g 1016.00m
/dev/sdc   testvg lvm2 a--  2.00g    2.00g
/dev/vdb   testvg lvm2 a--  2.00g    2.00g
/dev/vdc   testvg lvm2 a--  2.00g    2.00g
suse11-1:~ #
Remove the disks from the Volume Group
suse11-1:~ # vgreduce testvg /dev/sdc /dev/vdb /dev/vdc
Removed "/dev/sdc" from volume group "testvg"
Removed "/dev/vdb" from volume group "testvg"
Removed "/dev/vdc" from volume group "testvg"
suse11-1:~ # vgs
VG     #PV #LV #SN Attr   VSize VFree
testvg   2   1   0 wz--n- 3.99g 1016.00m
Now you can see from pvs command that disks are not assigned to any of the volume group
suse11-1:~ # pvs
PV         VG     Fmt  Attr PSize PFree
/dev/sda   testvg lvm2 a--  2.00g       0
/dev/sdb   testvg lvm2 a--  2.00g 1016.00m
/dev/sdc          lvm2 a--  2.00g    2.00g
/dev/vdb          lvm2 a--  2.00g    2.00g
/dev/vdc          lvm2 a--  2.00g    2.00g
Remove the disks from PV
suse11-1:~ # pvremove /dev/sdc /dev/vdb /dev/vdc
Labels on physical volume "/dev/sdc" successfully wiped
Labels on physical volume "/dev/vdb" successfully wiped
Labels on physical volume "/dev/vdc" successfully wiped
Now disks are removed from the PV
suse11-1:~ # pvs
PV         VG     Fmt  Attr PSize PFree
/dev/sda   testvg lvm2 a--  2.00g       0
/dev/sdb   testvg lvm2 a--  2.00g 1016.00m
But still disks are visible to the OS, this can be found thru cat /proc/partitions command
suse11-1:~ # cat /proc/partitions
major minor  #blocks  name

253        0   20971520 vda
253        1    1532928 vda1
253        2   19437568 vda2
253       16    2097152 vdb
253       32    2097152 vdc
8       16    2097152 sdb
8        0    2097152 sda
8       32    2097152 sdc
252        0    3145728 dm-0
If you partition the disk before adding to the PV then remove the partition before removing the disk from the OS level.
suse11-1:/test # echo 1 > /sys/block/sdc/device/delete
suse11-1:/test #
Finally inform to Vmware or SAN team to reclaim the disk from the server otherwise it woul.d have show again in OS level if you scan or reboot the server.
Was this article helpful?
About Ramesh Sundararamaiah
Red Hat Certified Architect
Expert in Linux system administration, DevOps automation, and cloud infrastructure. Specializing in Red Hat Enterprise Linux, CentOS, Ubuntu, Docker, Ansible, and enterprise IT solutions.