How to Extend LVM Partition in Linux: Complete Guide
🎯 Key Takeaways
- Introduction to LVM Architecture
- Prerequisites Before Extending LVM
- Extending LVM Partition: Step-by-Step Guide
- Adding New Disk to Volume Group
- Extending LVM with Partition Instead of Whole Disk
📑 Table of Contents
- Introduction to LVM Architecture
- Prerequisites Before Extending LVM
- Extending LVM Partition: Step-by-Step Guide
- Adding New Disk to Volume Group
- Extending LVM with Partition Instead of Whole Disk
- Extending Root Filesystem
- Common LVM Management Commands
- Troubleshooting LVM Extension Issues
- LVM Snapshots for Safe Extension
- Frequently Asked Questions
- Conclusion
LVM (Logical Volume Manager) provides flexible disk management in Linux by allowing dynamic resizing of partitions without downtime. Unlike traditional partitioning, LVM enables administrators to expand or shrink filesystems on-the-fly, making it essential for modern Linux servers where storage requirements change over time. This comprehensive guide covers extending LVM partitions, adding physical volumes, managing volume groups, and troubleshooting common issues.
📑 Table of Contents
- Introduction to LVM Architecture
- Prerequisites Before Extending LVM
- Verify Available Space in Volume Group
- If Space Not Available: Request Additional Disk
- Extending LVM Partition: Step-by-Step Guide
- Step 1: Verify Current LVM Configuration
- Step 2: Extend the Logical Volume
- Step 3: Resize the Filesystem
- Step 4: Verify the Space Increase
- Adding New Disk to Volume Group
- Step 1: Identify the New Disk
- Step 2: Create Physical Volume
- Step 3: Extend Volume Group
- Step 4: Extend Logical Volume
- Extending LVM with Partition Instead of Whole Disk
- Extending Root Filesystem
- Common LVM Management Commands
- Display Commands
- Creation Commands
- Extend Commands
- Troubleshooting LVM Extension Issues
- Issue: resize2fs Shows “Bad magic number in super-block”
- Issue: Not Enough Free Space in VG
- Issue: Device is Busy
- LVM Snapshots for Safe Extension
- Frequently Asked Questions
- Can I extend an LVM partition without unmounting it?
- What’s the difference between lvextend -L+10G and lvextend -L 10G?
- Why does resize2fs fail with “Bad magic number in super-block”?
- How do I check which filesystem type my LVM uses?
- Can I add a disk to VG without rebooting?
- What happens if I run lvextend but forget to run resize2fs?
- How do I extend root partition during boot issues?
- Can I extend LVM across multiple physical disks?
- What’s the maximum size for LVM volumes?
- How do I safely test LVM extension before doing it in production?
- Conclusion
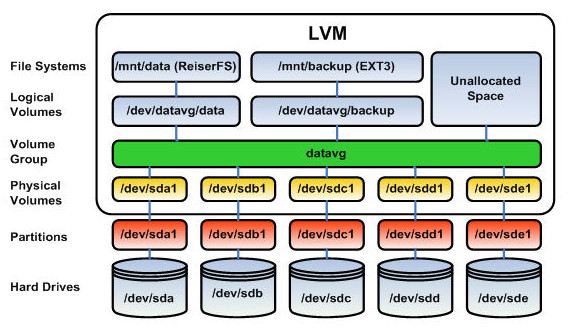
Introduction to LVM Architecture
LVM creates an abstraction layer between physical storage and filesystems. It consists of three main components:
- Physical Volumes (PV): Physical disks or partitions (/dev/sda1, /dev/sdb)
- Volume Groups (VG): Pool of storage combining one or more PVs
- Logical Volumes (LV): Virtual partitions carved from VG space
This architecture allows resizing logical volumes by adding physical disks to volume groups, then extending logical volumes using the available space.
Prerequisites Before Extending LVM
Verify Available Space in Volume Group
Before extending an LVM partition, check if free space exists in the volume group:
# Check volume groups and available space
vgs

# Example output:
VG   #PV #LV #SN Attr   VSize VFree
vg0    1   1   0 wz--n- 3.06G 2.06G
The VFree column shows available space. If VFree shows 0 or insufficient space, you need to add a new physical disk to the volume group first.
If Space Not Available: Request Additional Disk
If required space is not available in the VG, request VMware or SAN team for a new disk. After the disk is provisioned, you’ll need to add it as a physical volume to your volume group.
Extending LVM Partition: Step-by-Step Guide
Step 1: Verify Current LVM Configuration
# Display volume groups
vgs

# Display logical volumes
lvs

# Display physical volumes
pvs

# Check current filesystem usage
df -h
Step 2: Extend the Logical Volume
Once free space is available in the volume group, extend the logical volume:
# Extend by specific size (add 500MB)
lvextend -L+500M /dev/vg0/lvm1

# Example output:
Extending logical volume lvm1 to 1.49 GB
Logical volume lvm1 successfully resized

# Extend to use all free space in VG
lvextend -l +100%FREE /dev/vg0/lvm1

# Extend to specific total size (make it 10GB total)
lvextend -L 10G /dev/vg0/lvm1
Step 3: Resize the Filesystem
For ext4/ext3 filesystems:
# Resize ext4 filesystem to use new space
resize2fs /dev/vg0/lvm1

# Example output:
resize2fs 1.41.9 (22-Aug-2009)
Filesystem at /dev/vg0/lvm1 is mounted on /lvm1; on-line resizing required
old_desc_blocks = 1, new_desc_blocks = 1
Performing an on-line resize of /dev/vg0/lvm1 to 390144 (4k) blocks.
The filesystem on /dev/vg0/lvm1 is now 390144 blocks long.
For XFS filesystems:
# XFS uses xfs_growfs instead of resize2fs
xfs_growfs /dev/vg0/lvm1

# Or specify mount point
xfs_growfs /lvm1
Step 4: Verify the Space Increase
# Verify new filesystem size
df -h /lvm1/

# Example output:
Filesystem            Size  Used Avail Use% Mounted on
/dev/mapper/vg0-lvm1  1.5G   35M  1.4G   3% /lvm1
Adding New Disk to Volume Group
When no free space exists in the volume group, add a new physical disk:
Step 1: Identify the New Disk
# List all disks
lsblk

# Or use fdisk
fdisk -l

# New disk might appear as /dev/sdb or /dev/sdc
Step 2: Create Physical Volume
# Create PV on new disk
pvcreate /dev/sdb

# Verify PV creation
pvs
pvdisplay /dev/sdb
Step 3: Extend Volume Group
# Add new PV to existing VG
vgextend vg0 /dev/sdb

# Verify VG now has more space
vgs
Step 4: Extend Logical Volume
# Now extend LV using newly available space
lvextend -L+10G /dev/vg0/lvm1

# Resize filesystem
resize2fs /dev/vg0/lvm1  # for ext4
# or
xfs_growfs /lvm1  # for XFS
Extending LVM with Partition Instead of Whole Disk
Sometimes you need to use a partition rather than the entire disk:
# Create partition
fdisk /dev/sdb
# Create new partition (type 8e for LVM)

# Create physical volume on partition
pvcreate /dev/sdb1

# Add to volume group
vgextend vg0 /dev/sdb1

# Extend logical volume
lvextend -L+5G /dev/vg0/lvm1

# Resize filesystem
resize2fs /dev/vg0/lvm1
Extending Root Filesystem
Extending the root (/) filesystem follows the same process:
# Extend root LV
lvextend -L+10G /dev/mapper/rhel-root

# Resize root filesystem (works while mounted)
resize2fs /dev/mapper/rhel-root  # ext4
# or
xfs_growfs /  # XFS

# Verify
df -h /
Common LVM Management Commands
Display Commands
# Physical volumes
pvs          # Summary
pvdisplay    # Detailed info
pvdisplay /dev/sdb  # Specific PV

# Volume groups
vgs          # Summary
vgdisplay    # Detailed info
vgdisplay vg0  # Specific VG

# Logical volumes
lvs          # Summary
lvdisplay    # Detailed info
lvdisplay /dev/vg0/lvm1  # Specific LV
Creation Commands
# Create PV
pvcreate /dev/sdb

# Create VG
vgcreate vg0 /dev/sdb /dev/sdc

# Create LV
lvcreate -L 10G -n lvm1 vg0
lvcreate -l 100%FREE -n lvm2 vg0
Extend Commands
# Extend VG
vgextend vg0 /dev/sdd

# Extend LV
lvextend -L+5G /dev/vg0/lvm1      # Add 5GB
lvextend -L 20G /dev/vg0/lvm1     # Set to 20GB total
lvextend -l +100%FREE /dev/vg0/lvm1  # Use all free space
Troubleshooting LVM Extension Issues
Issue: resize2fs Shows “Bad magic number in super-block”
This error occurs when trying to use resize2fs on XFS or other non-ext filesystems:
# Error example:
resize2fs /dev/vg0/lvm1
resize2fs: Bad magic number in super-block while trying to open /dev/vg0/lvm1
Couldn't find valid filesystem superblock.
Solution: Check filesystem type and use correct resize command:
# Check filesystem type
df -Th /lvm1

# If XFS, use xfs_growfs
xfs_growfs /lvm1

# If ext4, use resize2fs
resize2fs /dev/vg0/lvm1
Issue: Not Enough Free Space in VG
# Error:
Insufficient free space: 1024 extents needed, but only 512 available

# Solution: Add new disk to VG
pvcreate /dev/sdc
vgextend vg0 /dev/sdc
Issue: Device is Busy
# If LV is in use
# Check what's using it
fuser -vm /dev/vg0/lvm1
lsof /lvm1

# Stop services if needed
systemctl stop service-name
LVM Snapshots for Safe Extension
Create snapshots before major changes for easy rollback:
# Create snapshot before extending
lvcreate -L 1G -s -n lvm1-snapshot /dev/vg0/lvm1

# Perform extension operations
lvextend -L+5G /dev/vg0/lvm1
resize2fs /dev/vg0/lvm1

# If successful, remove snapshot
lvremove /dev/vg0/lvm1-snapshot

# If problems occur, revert to snapshot
lvconvert --merge /dev/vg0/lvm1-snapshot
# Reboot to complete merge
Frequently Asked Questions
Can I extend an LVM partition without unmounting it?
Yes, both ext4 and XFS support online resizing, meaning you can extend filesystems while they’re mounted and in use. The lvextend command works regardless of mount status, and resize2fs (for ext4) and xfs_growfs (for XFS) both support online expansion. This allows zero-downtime storage expansion, critical for production systems. However, shrinking filesystems typically requires unmounting.
What’s the difference between lvextend -L+10G and lvextend -L 10G?
The -L+10G syntax adds 10GB to the current size (relative increase), while -L 10G sets the total size to 10GB (absolute size). For example, if your LV is currently 5GB, -L+10G makes it 15GB, but -L 10G makes it 10GB. Use + for adding space, omit + for setting exact size. Using -l +100%FREE extends to use all available space in the VG.
Why does resize2fs fail with “Bad magic number in super-block”?
This error occurs when using resize2fs on non-ext filesystems. XFS filesystems require xfs_growfs instead of resize2fs. Check your filesystem type with “df -Th” or “lsblk -f”, then use the appropriate resize command: resize2fs for ext2/ext3/ext4, xfs_growfs for XFS. This is the most common mistake when extending LVM partitions.
How do I check which filesystem type my LVM uses?
Use several commands to identify filesystem type: “df -Th” shows type for mounted filesystems, “lsblk -f” displays filesystem types for all block devices, “blkid /dev/vg0/lvm1” shows detailed filesystem info, or “file -sL /dev/vg0/lvm1” provides filesystem identification. Knowing the type is crucial for choosing the correct resize command.
Can I add a disk to VG without rebooting?
Yes, Linux supports hot-adding storage in most environments. For VMware VMs, add the disk through vSphere, then run “echo ‘- – -‘ > /sys/class/scsi_host/host0/scan” to detect new disks without reboot. For physical servers with hot-swap bays, insert the disk and rescan SCSI bus. Then use pvcreate and vgextend to add the new disk to your volume group immediately.
What happens if I run lvextend but forget to run resize2fs?
The logical volume will be larger, but the filesystem won’t use the new space. Running “df -h” will still show the old size. The additional space exists but remains unused until you run resize2fs (ext4) or xfs_growfs (XFS). You can run the filesystem resize command at any time afterward – no data loss occurs, the space just remains unavailable until the filesystem is expanded.
How do I extend root partition during boot issues?
Boot from rescue media (installation ISO or SystemRescue), activate the volume groups with “vgchange -ay”, extend the LV with “lvextend -L+10G /dev/vg0/root”, then resize the filesystem. For ext4: “e2fsck -f /dev/vg0/root” then “resize2fs /dev/vg0/root”. For XFS: mount it first, then “xfs_growfs /mnt”. Reboot normally after extending.
Can I extend LVM across multiple physical disks?
Yes, that’s a core LVM feature. Add multiple disks to a single volume group using pvcreate and vgextend for each disk, then the logical volume can span across all disks in the VG. The filesystem sees one contiguous space regardless of physical disk boundaries. This provides both flexibility and performance, as I/O can be distributed across multiple disks.
What’s the maximum size for LVM volumes?
LVM2 theoretically supports volumes up to 8 exabytes (8 million terabytes), far exceeding practical limits of physical storage. Real-world limits depend on filesystem type: ext4 supports up to 1 exabyte volumes, XFS supports 8 exabytes. For most use cases, you’ll hit hardware limits before LVM or filesystem limits. LVM is suitable for any enterprise storage requirement.
How do I safely test LVM extension before doing it in production?
Create an LVM snapshot before extending: “lvcreate -L 1G -s -n lvm1-snapshot /dev/vg0/lvm1”. Perform the extension. If successful, remove the snapshot: “lvremove /dev/vg0/lvm1-snapshot”. If problems occur, merge the snapshot to revert: “lvconvert –merge /dev/vg0/lvm1-snapshot” and reboot. Alternatively, practice in a test VM that mirrors your production LVM configuration.
Conclusion
Extending LVM partitions is a fundamental Linux administration task that provides flexibility unavailable with traditional partitioning. By understanding the three-tier LVM architecture—physical volumes, volume groups, and logical volumes—administrators can dynamically resize storage without downtime or data loss. Whether adding space to application filesystems, expanding root partitions, or managing enterprise storage arrays, LVM provides the tools needed for efficient, flexible storage management.
Remember to always verify free space in volume groups before extending, use the correct filesystem resize command (resize2fs for ext4, xfs_growfs for XFS), and consider creating snapshots before major changes. With these practices, LVM extension becomes a routine, safe operation that keeps pace with growing storage demands.
Was this article helpful?
About Ramesh Sundararamaiah
Red Hat Certified Architect
Expert in Linux system administration, DevOps automation, and cloud infrastructure. Specializing in Red Hat Enterprise Linux, CentOS, Ubuntu, Docker, Ansible, and enterprise IT solutions.