How to run adhoc commands in Ansible Tower

🎯 Key Takeaways
- Introduction to Ansible Tower Ad Hoc Commands
- Prerequisites
- Step 1: Login to Ansible Tower
- Step 2: Select Inventory and Host
- Step 3: Configure the Ad Hoc Command
📑 Table of Contents
- Introduction to Ansible Tower Ad Hoc Commands
- Prerequisites
- Step 1: Login to Ansible Tower
- Step 2: Select Inventory and Host
- Step 3: Configure the Ad Hoc Command
- Step 4: Viewing the Results
- Common Ansible Modules for Ad Hoc Commands
- Best Practices for Using Ad Hoc Commands in Tower
- Viewing Ad Hoc Command History
- Troubleshooting Common Issues
- Advantages of Using Ansible Tower for Ad Hoc Commands
- Conclusion
Introduction to Ansible Tower Ad Hoc Commands
Ansible Tower (now known as Red Hat Ansible Automation Platform) provides a powerful web-based user interface for managing Ansible automation. While most users leverage Tower for running playbooks and scheduled jobs, the ad hoc command feature offers a quick way to execute one-time tasks directly from the web interface without writing a playbook.
📑 Table of Contents
- Introduction to Ansible Tower Ad Hoc Commands
- Prerequisites
- Step 1: Login to Ansible Tower
- Step 2: Select Inventory and Host
- Step 3: Configure the Ad Hoc Command
- Step 4: Viewing the Results
- Common Ansible Modules for Ad Hoc Commands
- Best Practices for Using Ad Hoc Commands in Tower
- Viewing Ad Hoc Command History
- Troubleshooting Common Issues
- Advantages of Using Ansible Tower for Ad Hoc Commands
- Conclusion
Ad hoc commands in Ansible Tower are particularly useful for:
- Quick troubleshooting and diagnostics
- Testing connectivity to managed nodes
- Gathering system information rapidly
- Performing emergency maintenance tasks
- Validating inventory configurations
- Training team members on Ansible modules
In this tutorial, we’ll walk through the complete process of running ad hoc commands in Ansible Tower using the graphical interface.
Prerequisites
Before you begin, ensure you have:
- Access to an Ansible Tower installation with valid credentials
- At least one inventory configured with managed hosts
- Proper permissions to execute ad hoc commands
- Valid credentials configured for authentication to managed nodes
Step 1: Login to Ansible Tower
Accessing the Ansible Tower Dashboard
Navigate to your Ansible Tower web interface using your browser and log in with your credentials. Once logged in, you’ll see the main dashboard displaying various resources such as Projects, Inventories, Templates, and Jobs.
From the left sidebar menu, click on Inventories to view all configured inventories in your Tower installation.
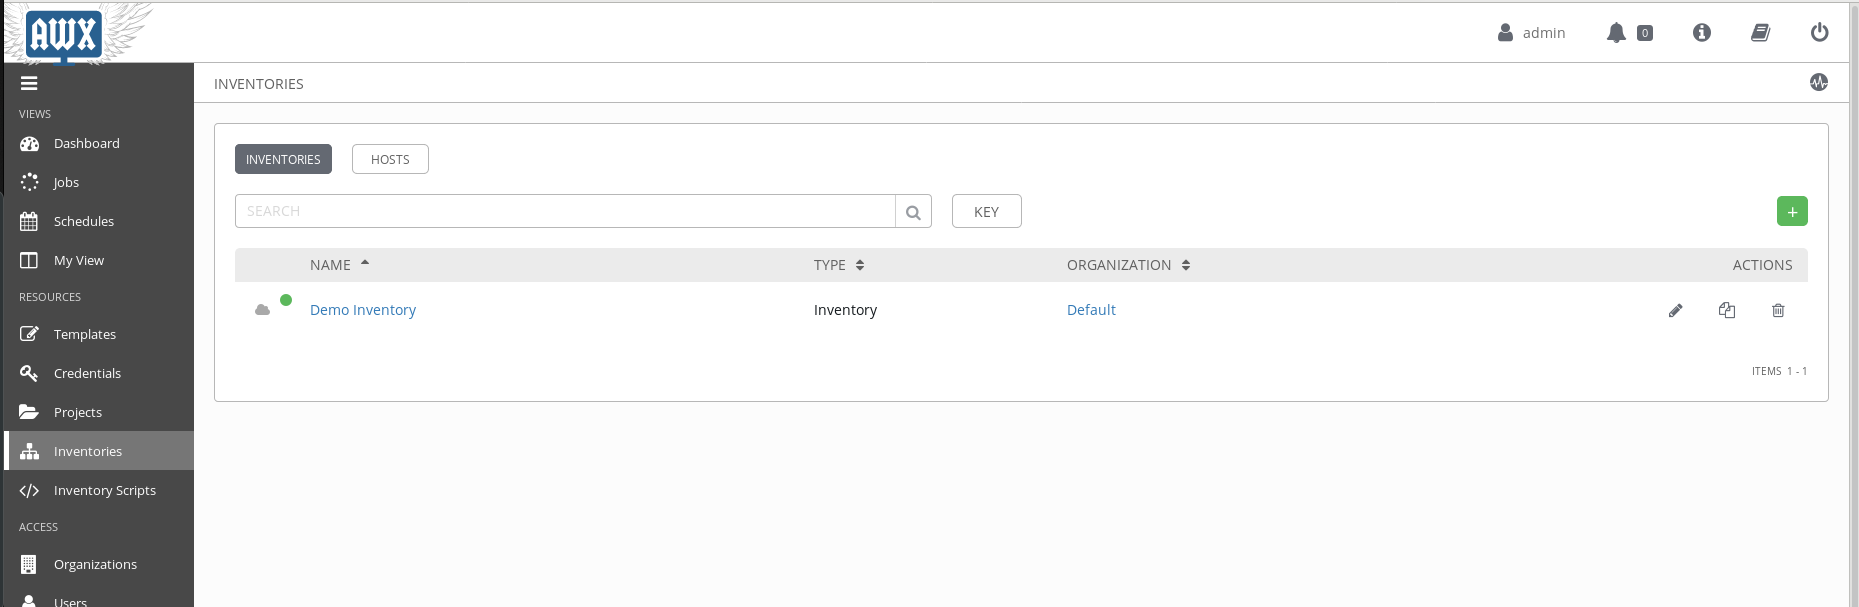
What is an Inventory?
An inventory in Ansible Tower is a collection of hosts (servers, network devices, cloud instances) that Ansible can manage. Inventories can be organized into groups, and each host can have associated variables for configuration.
Step 2: Select Inventory and Host
Navigating to the Ad Hoc Command Interface
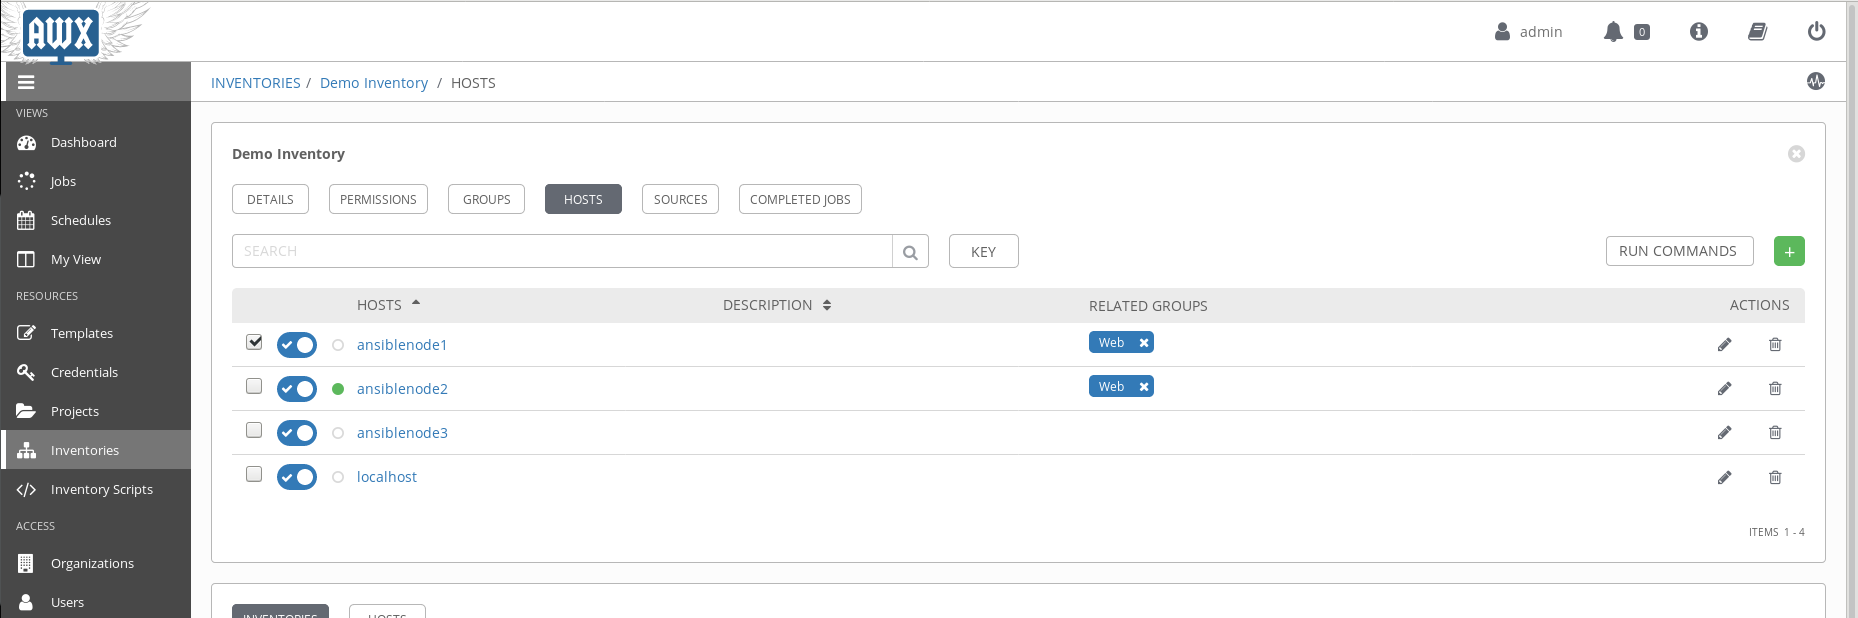
Click on the inventory that contains the hosts you want to target. This will open the inventory details page showing groups and individual hosts. Select the specific host or group where you want to run the ad hoc command.
In the upper right corner of the host view, locate and click the Run Command button. This button may appear as a rocket ship icon or be labeled explicitly as “Run Command”.
Important Note: If the Run Command button is grayed out or unavailable, verify that:
- You have the necessary permissions (Execute role on the inventory)
- Valid machine credentials are associated with the host
- The host is not currently locked or being used by another job
Step 3: Configure the Ad Hoc Command
Selecting the Module and Parameters
After clicking Run Command, a dialog box will appear with several configuration options:
- Module: Select the Ansible module to execute (e.g., ping, shell, command, yum, service)
- Arguments: Provide module-specific arguments if required
- Limit: Optionally narrow down the hosts within your selection
- Machine Credential: Choose the credential for authentication
- Verbosity: Set the output detail level (0-4)
- Forks: Number of parallel processes (default: 5)
For this example, we’ll use the ping module to test connectivity. The ping module doesn’t require any arguments and simply verifies that Ansible can connect to the host and execute Python code.
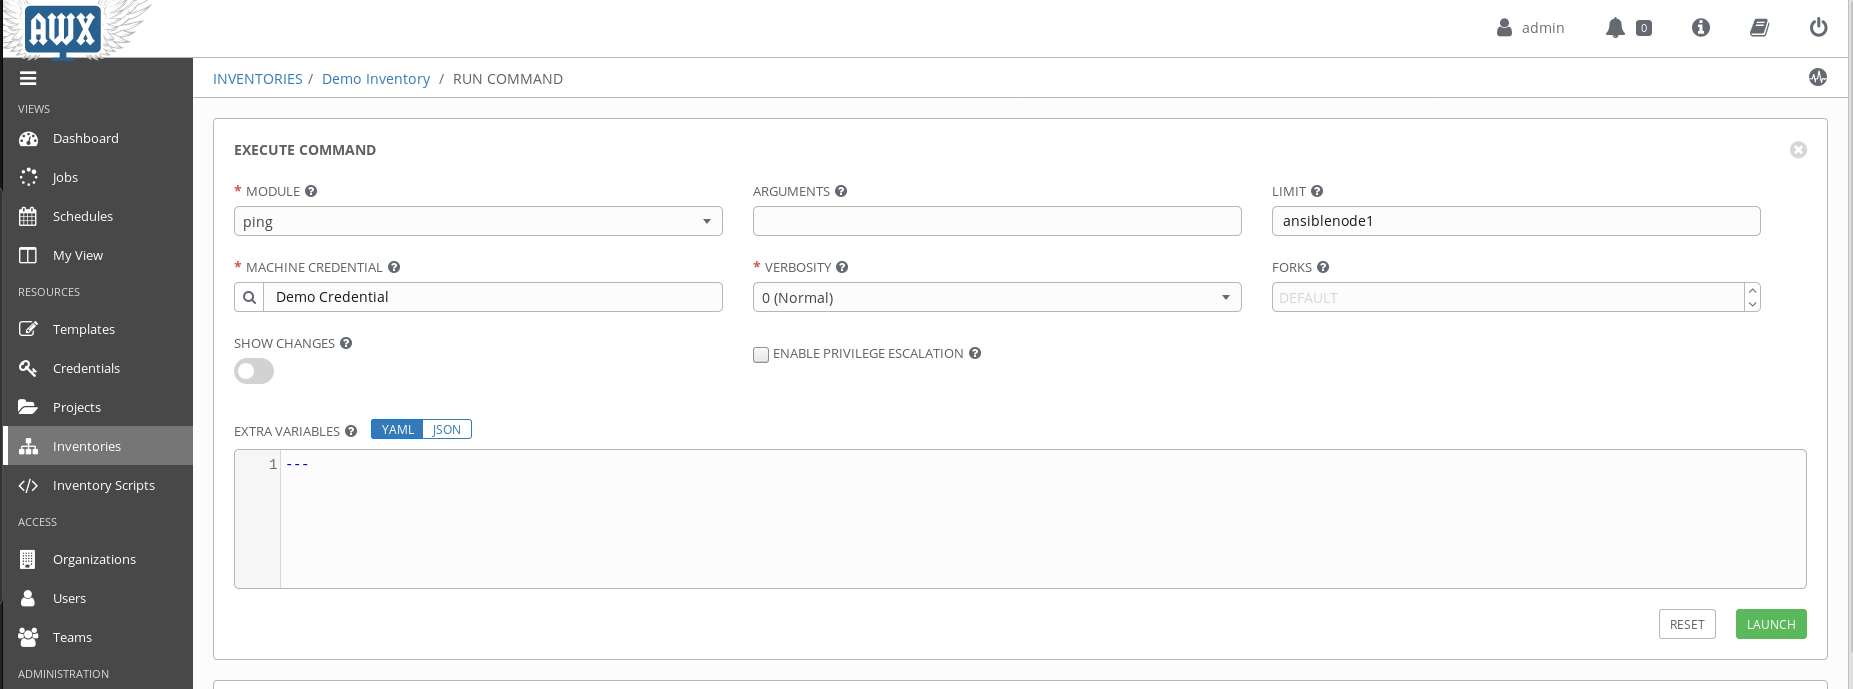
After configuring your options, click the Launch button to execute the ad hoc command.
Step 4: Viewing the Results
Interpreting Ad Hoc Command Output
Once you click Launch, Ansible Tower will execute the command and display the results in real-time. The output shows:
- Status: SUCCESS, FAILED, or CHANGED
- Execution Time: How long the task took to complete
- Return Values: JSON-formatted output from the module
- Standard Output: Any text output from the command
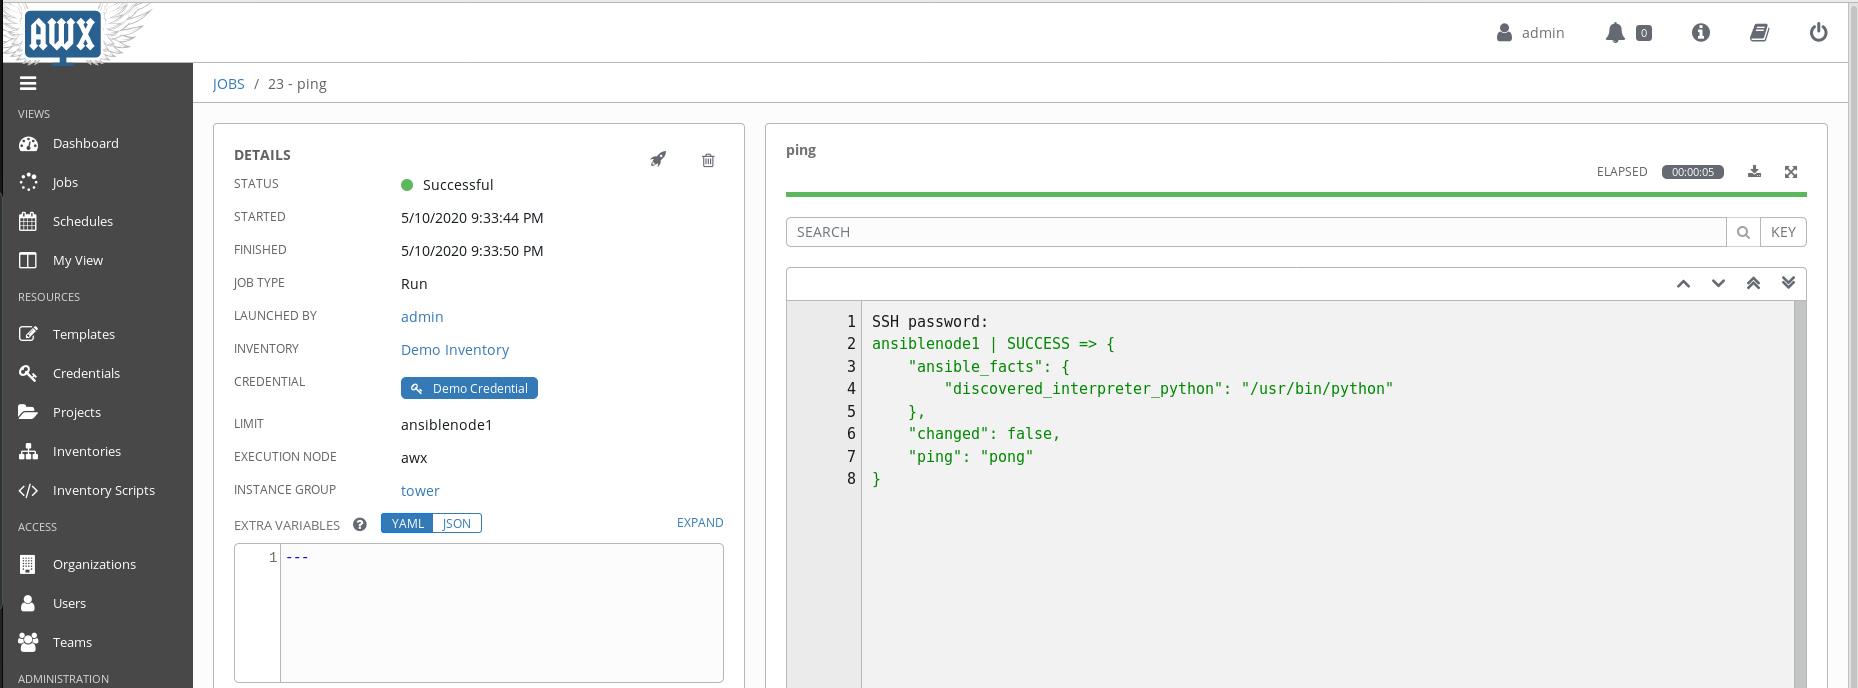
In this example, the ping module successfully executed on the selected server and returned “pong”, indicating successful connectivity. The green SUCCESS status confirms that Ansible Tower can communicate with and control the managed node.
Common Ansible Modules for Ad Hoc Commands
Frequently used modules in Ansible Tower:
1. Ping Module
Tests connectivity and Python availability on managed nodes.
- Module: ping
- Arguments: None required
- Use Case: Verifying host accessibility
2. Command Module
Executes commands on remote nodes without shell processing.
- Module: command
- Arguments: uptime, hostname, date, etc.
- Use Case: Running simple system commands
3. Shell Module
Runs commands through the shell with variable expansion and piping.
- Module: shell
- Arguments: df -h, ps aux | grep httpd
- Use Case: Complex commands requiring shell features
4. Service Module
Manages system services (start, stop, restart, status).
- Module: service
- Arguments: name=httpd state=started
- Use Case: Service management
5. Yum Module
Manages packages on RHEL/CentOS systems.
- Module: yum
- Arguments: name=httpd state=present
- Use Case: Package installation and updates
6. Copy Module
Copies files to managed nodes.
- Module: copy
- Arguments: src=/tmp/file dest=/opt/file
- Use Case: File distribution
Best Practices for Using Ad Hoc Commands in Tower
- Use for Quick Tasks Only: For complex or repeated tasks, create a job template with a playbook instead
- Test on Single Hosts First: Before running on large groups, test your command on a single host
- Review Audit Logs: Tower logs all ad hoc commands for compliance and troubleshooting
- Use Appropriate Verbosity: Increase verbosity (-v, -vv, -vvv) when troubleshooting failures
- Limit Concurrent Executions: Adjust forks based on your infrastructure capacity
- Prefer Modules Over Shell: Ansible modules provide better error handling and idempotency
- Check Permissions: Ensure you have the necessary RBAC permissions before attempting commands
Viewing Ad Hoc Command History
Tracking past executions for audit and troubleshooting
All ad hoc commands executed in Ansible Tower are logged and can be reviewed:
- Navigate to Views → Jobs from the left sidebar
- Filter by job type “Ad Hoc Command”
- Click on any command to view detailed output and execution history
- Review standard output, error messages, and execution time
This audit trail is valuable for:
- Compliance and security auditing
- Troubleshooting failed commands
- Understanding who executed what and when
- Learning from successful automation patterns
Troubleshooting Common Issues
Connection Failed:
- Verify SSH connectivity from Tower to the managed node
- Check that the machine credential is valid and not expired
- Ensure the SSH key is properly configured on the target host
- Verify firewall rules allow SSH traffic (port 22)
Permission Denied:
- Confirm the credential has appropriate sudo privileges
- Check become/privilege escalation settings
- Verify SELinux is not blocking execution
Module Not Found:
- Ensure Python is installed on the managed node
- Verify the ansible_python_interpreter variable if using custom Python
- Check that the module name is spelled correctly
Advantages of Using Ansible Tower for Ad Hoc Commands
- User-Friendly Interface: No need for command-line access or SSH client
- Role-Based Access Control: Granular permissions for different team members
- Audit Trail: Complete logging of who ran what commands and when
- Credential Management: Centralized, secure storage of authentication credentials
- Real-Time Output: View command execution results as they happen
- Multi-Host Execution: Run commands across multiple hosts simultaneously
- Integration: Seamlessly integrates with your existing Ansible Tower workflows
Conclusion
Running ad hoc commands in Ansible Tower provides a powerful, user-friendly way to perform quick automation tasks without writing playbooks. The graphical interface makes Ansible accessible to team members who may not be comfortable with command-line tools, while still maintaining the security, audit trails, and centralized control that Tower provides.
While ad hoc commands are excellent for one-time tasks and troubleshooting, remember that for repeated or complex automation, creating proper job templates with playbooks is the recommended approach. This ensures repeatability, version control, and better documentation of your automation workflows.
As you become more comfortable with Ansible Tower’s ad hoc command feature, you’ll find it to be an invaluable tool in your automation toolkit, bridging the gap between quick manual fixes and fully automated playbook-based solutions.
Was this article helpful?
About Ramesh Sundararamaiah
Red Hat Certified Architect
Expert in Linux system administration, DevOps automation, and cloud infrastructure. Specializing in Red Hat Enterprise Linux, CentOS, Ubuntu, Docker, Ansible, and enterprise IT solutions.